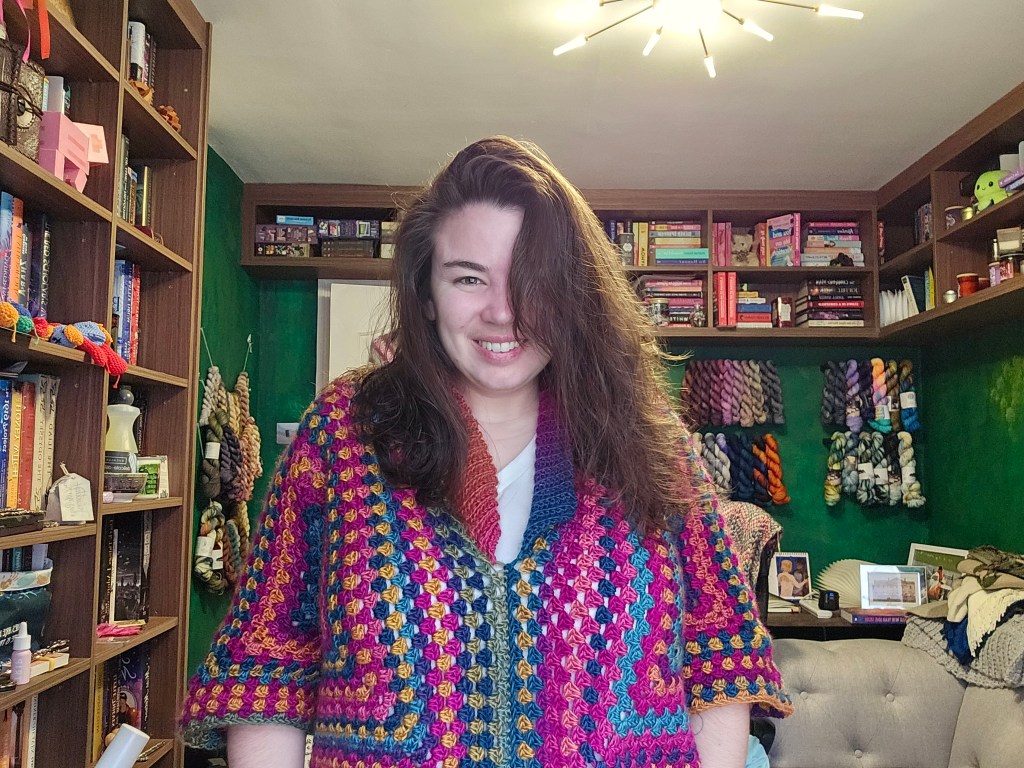
I had so much fun creating this top/half sleeve jumper. I think the colours are so bright and when I made it I had really strong feeling that I needed more colour in my winter wardrobe. Sadly the week that I finished this it ended up snowing here so it was way too cold to wear it!
But here it is, the pattern to my Fun on Fridays top.
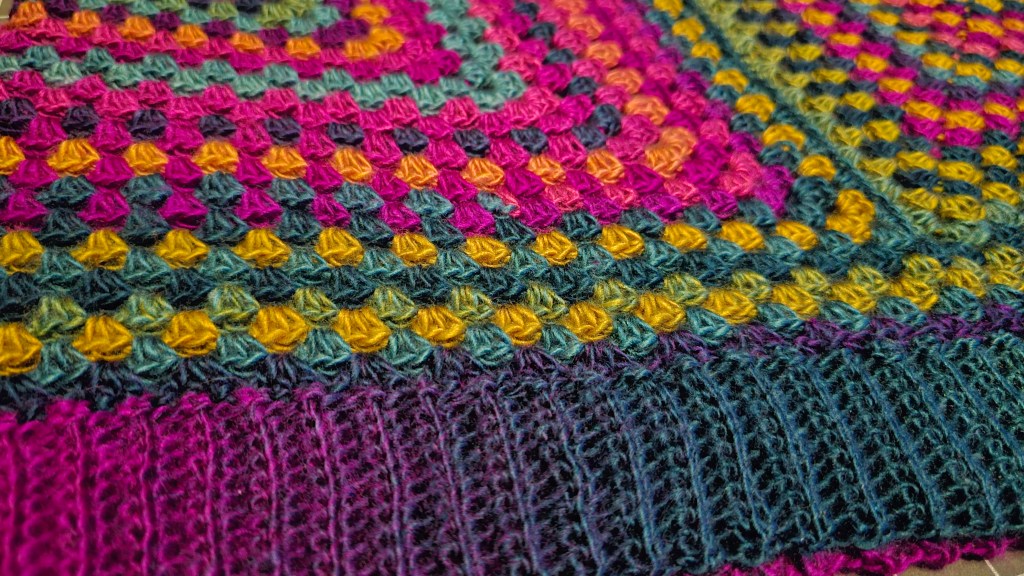
This pattern is fairly simple as it’s a Hexa-granny Top and worked in easy rounds.
For this project I used Hobbii’s Carnival Colour 14 AKA Nice. It’s a 100% Arcyllic and DK weighted yarn, and I used a 4.5mm hook for the whole project. You can grab the yarn here.
So here’s what you need:
Scissors
Stitch Marker
I used 4 Skeins of this yarn
4.5mm hook
Darning Needle
Terms (US Terms):
Ch: Chain
Slpst: Slip Stitch
HDC: Half Double Crochet
SC: Single Crochet
SCBLO: Single Crochet Back Loop Only
Let’s start.
So first of all, you’ll need to create a magic ring or a chain 4 loop. Personally I find magic rings really hard so I tend to go to the chain 4 loop.
So chain 4 and slip stitch into the first chain.
Round 1:
Chain 2 (this counts as a HDC), and place 2 HDCs into the hole in the middle of the ring/loop.
Chain 3 place 3 HDCs into the hole in the middle of the ring/loop.
Repeat the above until you have 6 HDC clusters, slpst into the top of the ch2.
The Ch3’s are the corners of each round.
Round 2:
Ch 2, place 3 HDCs into the first corner, ch3 and place another 3 HDCs into the same space.
Place 3 HDCs into the next corner, ch3, place another 3 HDCs into the same space.
Continue this until you get to the beginning ch2. In this corner place the first 3 HDCs and ch3, Place 2 HDCs and slpst into the top of the beginning ch2.
Continuing this will add a HDC cluster every row.
Do 20 rounds.
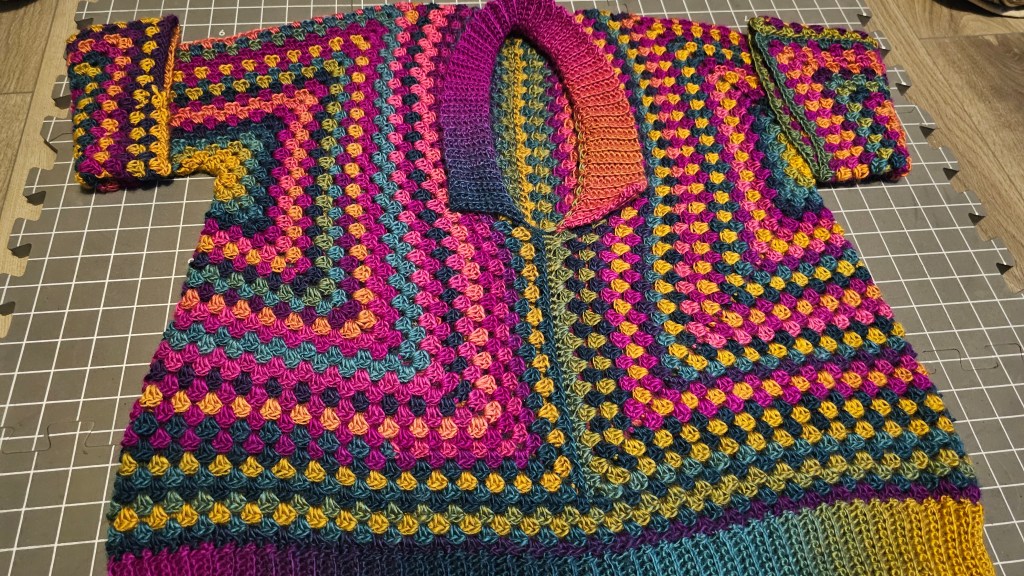
Once the 20 rounds have been completed fold your hexa granny square.
To fold the hexagranny square, fold corners 1 & 2 together and corners 3 & 6 together.
From here matress stitch along the top, doing this you now have half of a top.
The triangle that hasn’t been stitched closed, add 10 more rounds.

Do the same again for the second half of the top.
As there is only 2 corners now on both sides, count the HDC clusters on the long edge which is the back and front panel, and find the halfway point. Place a stitch marker in that halfway point on both panels that you’ve made.
Once youhave this done, place both edges of the back panels together and mattress stitch them together from the bottom to the stitch marker.
Put the top on now and decide where you want the stitching at the front to come to an end. This is completely up to you, how high or low you want the neckline to be. Place a stitch marker where you want it to be.
For mine I stopped the stitching on the third HDC of the 11th cluster.
Mattress stitch from the bottom to the placed stitch marker.
Now you have a full top, however, I found that mine wasn’t quite long enough for me.
So attach the yarn to anywhere on the hem of the top and ch2 and place 2 HDCs into the same space. Place 3 HDCs into each space around, slpst into the top of the ch2.
Repeat this 4 more times. Don’t tie off.
Here you want to make the real hem.
Before starting the hem, turn the top so that the right side is now facing out.
After you have done the slpst into the ch2 of the last row ch11.
SC into the second chain from the hook and into the remaining chains.
Slpst into the HDC after the joining Slpst and slpst into the HDC next to it. Turn the work.
Skip the slpsts and SC into the backloop of the last SC placed.
SCBLO up the scs. Ch1 and turn.
SCBLO down the scs. Slpst into the next 2 HDCs.
Repeat this all the way around.
Once you have reached the last slpst into the HDC, connect the sc rows using slpsts. Ch1 and tie off.
It’s a very similar process for the collar.
Attach the yarn on the left side of the neck hole opening, into the HDC stitch where you placed the last matress stitch.
Ch11
SC into the seond chain from the hook and all the way down.
Slpst into the next 2 HDCs
Skip the 2 slpsts and SCBLO into the SCs.
Repeat this all the way around the neck line.
Once you have reached the last HDC on the right hand side, ch1 and tie off.
Soak your top in warm water with some yarn soap and lie flat to dry.
One last step:
Enjoy your new handmade top!

Leave a comment